Baking Through the Alphabet: T is for Tiramisu Cake Roll

tiramisu-cake-roll-12

If you follow me on Instagram, you know I’ve been baking a lot lately.

tiramisu-cake-roll-7

Brownies, cookies, granola bars, breads, cakes. Brown butter everything.

tiramisu-cake-roll-4

There’s definitely something therapeutic about being in my own apartment kitchen space with every drawer and cabinet door open, flour and sugar spills on the counter, a sink full of dirty dishes, an oven preheated to 350 degrees, my Kitchen Aid running, and the music on and me dancing while trying to read and do as the recipe says. I’m in my zone.

tiramisu-cake-roll-9

I’m not necessarily stressed when I bake. I think sometimes it’s just the thought of bringing pastries to my friends that makes me happy. Sometimes it’s the joy of being able to serve and love others with something tangible.

tiramisu-cake-roll-2

But…sometimes I feel like it’s the only thing I have control over. I pick and choose my recipes based off of techniques I know or have studied and ingredients that I have on hand or are easily accessible. I have a general idea on what the outcome will be. As long as I know the technique and have the right ingredients, then it should be okay. Sometimes when life gets messy and unorganized, it’s helpful to be able to follow a set list of instructions.

tiramisu-cake-roll-6

But life is different. There are no instructions, there are no guarantees, and there is no perfection. In some situations, there is no confidence in myself that I’ll reach a certain place. There is no guarantee in this naive mindset of mine that I’ll be a certain person, that life will pan out in this direction, that this issue will be resolved with this plan. There is no science behind it.

tiramisu-cake-roll-10

And at the same time, I love it. I love the challenge because it grows me. I love the stresses, the memories, the experiences, the happiness, and the tears, because they all mold me to be my fullest potential. I love it because I know that I have Christ. And I remember Habakkuk 3, because even if the worst happens, God is still good. Even if the worst happens, God will carry us. Even if the worst happens, God’s grace is sufficient. Even if the worst happens, everything will be ok.

tiramisu-cake-roll-3

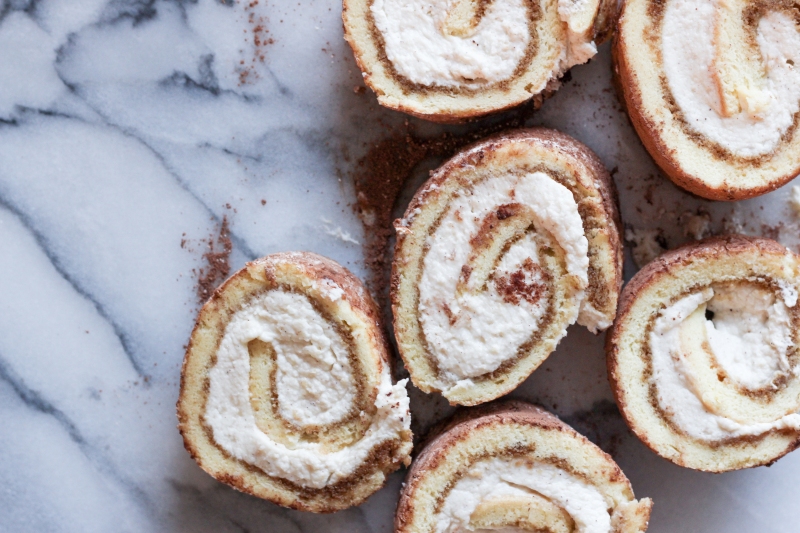
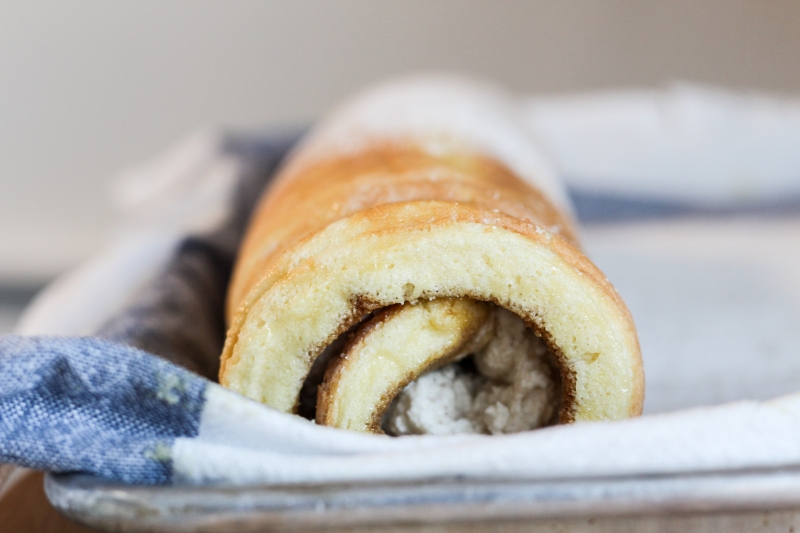
The first and last time I made a cake roll before this one was when I was in middle school. I attempted to make a chocolate cake roll with my mom. We had no idea what stiff peaks were and how to “gently fold.” I’m pretty sure “stir until there are no more lumps and stir a little longer to be safe” was a motto. We ended up with a giant chocolate cookie. It wasn’t good.

tiramisu-cake-roll

Since I’m now ten years older and wiser (hah), I figured it was time to give it a shot. I strayed away from the typical tiramisu trifle with ladyfingers (because it involves zero baking) and landed on a concept of a cake and a tiramisu. I gathered my ingredients, spent half an hour at Bevmo staring at the tiny bottles of liquor and figuring out what Amaretto was, and set off on this tiramisu adventure.

tiramisu-cake-roll-11

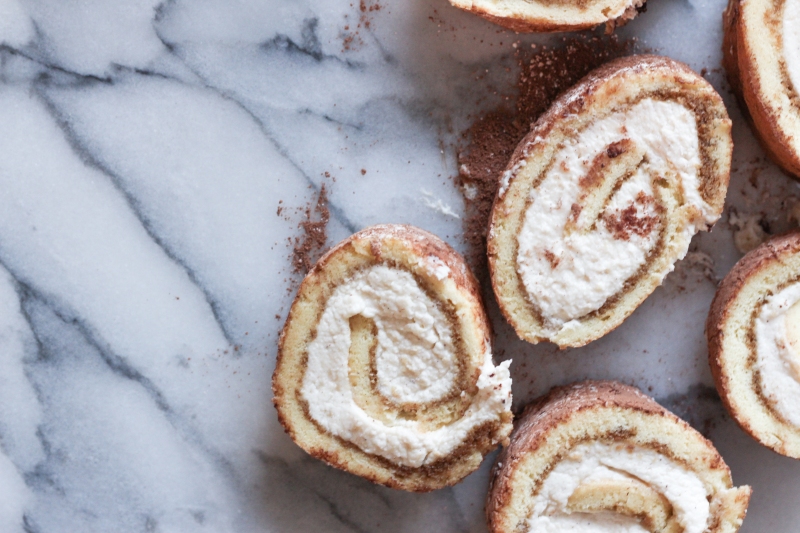
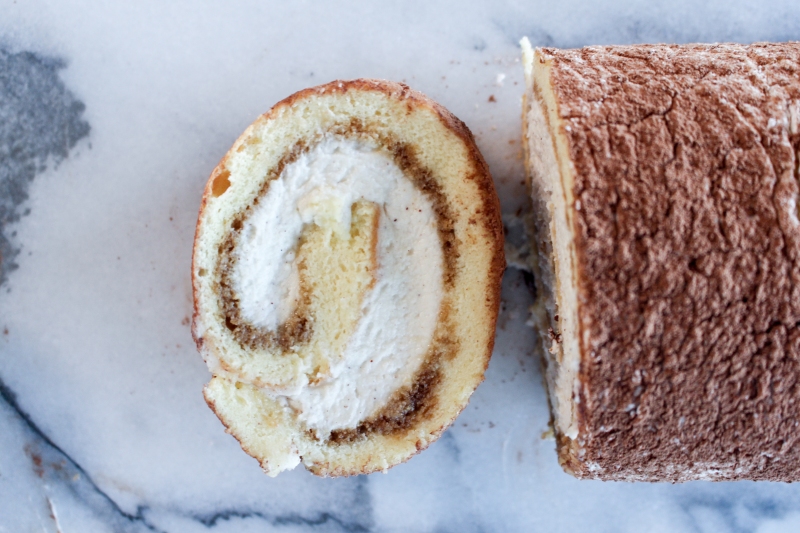
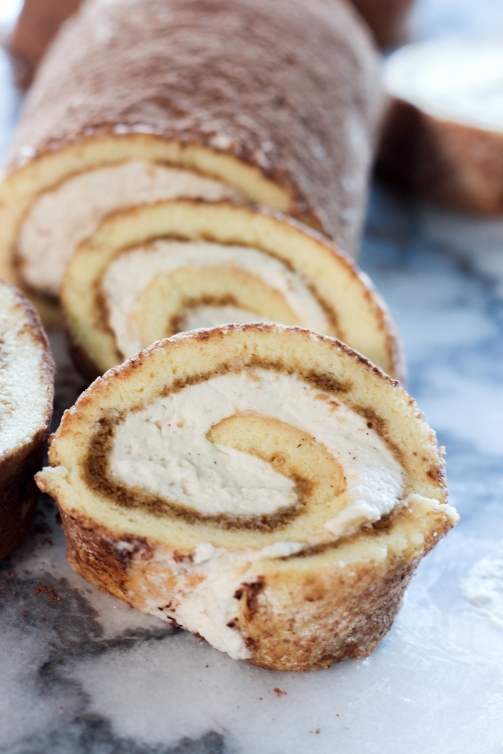
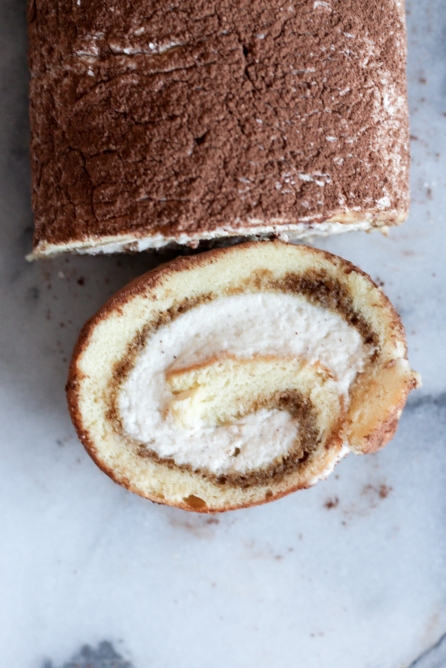
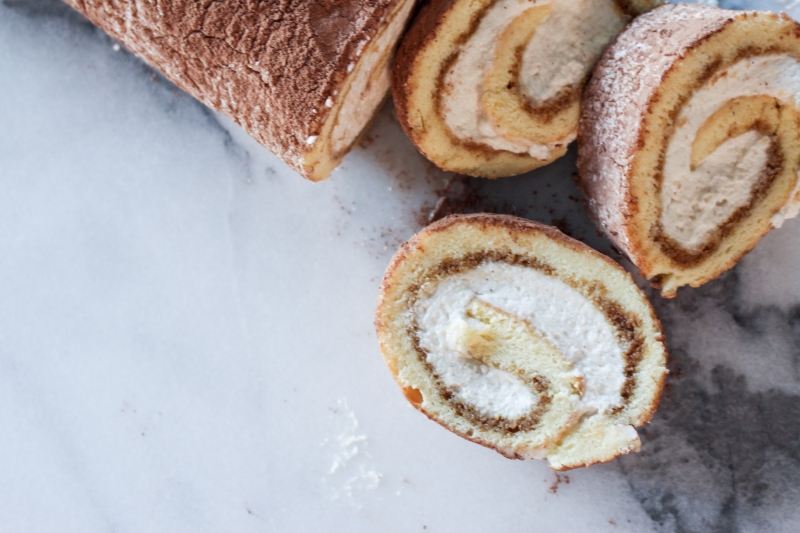
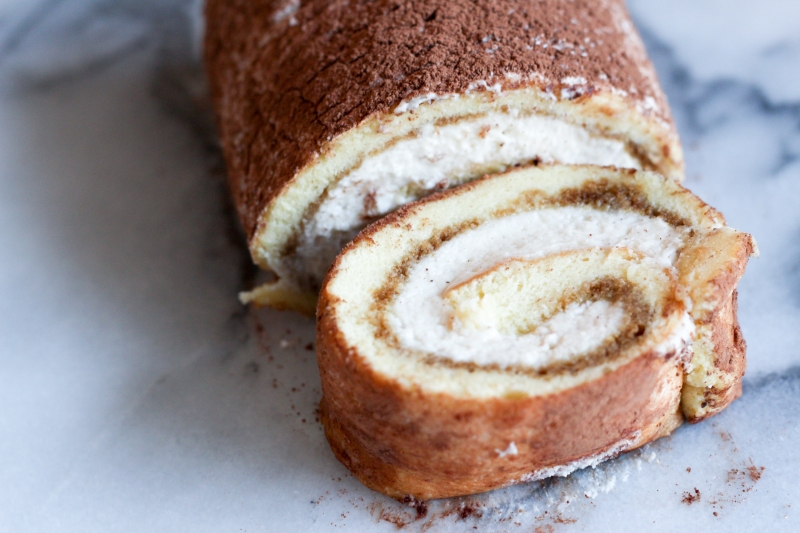
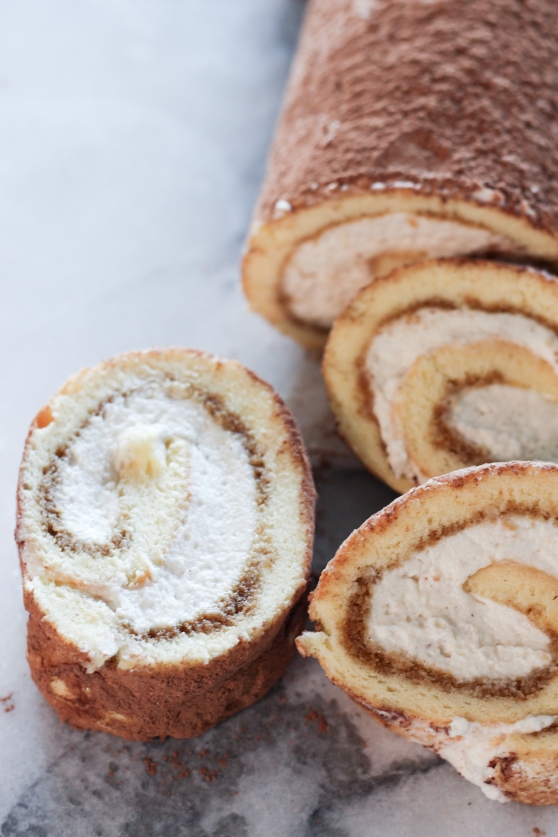
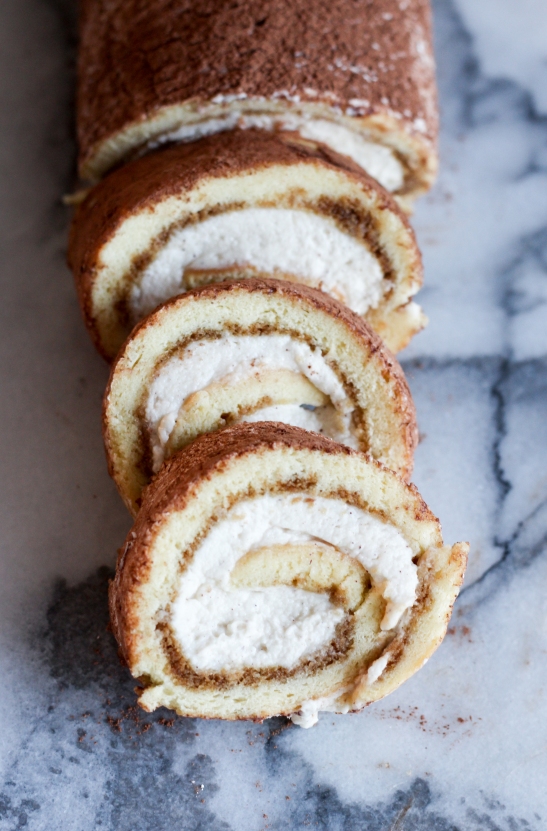
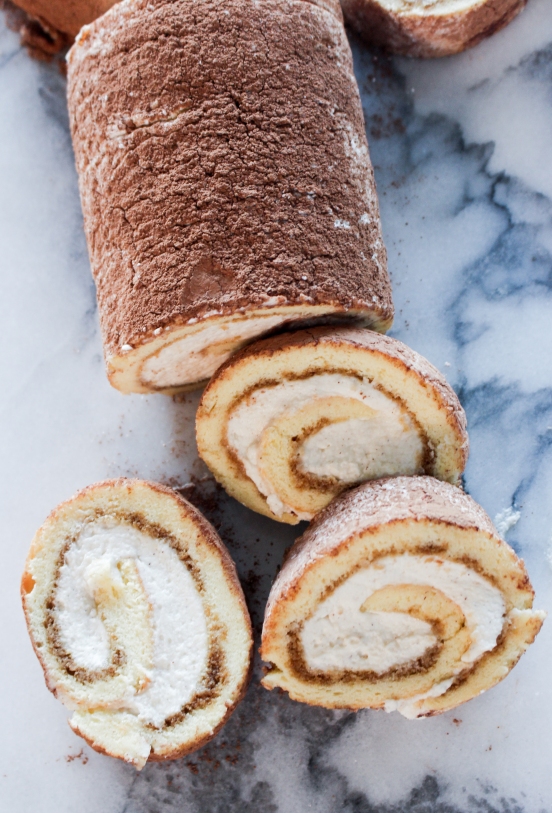
The cake came out well. It was soft, sweet (but not overbearing), and spongy, reminding me of the Asian sponge cakes I ate while growing up. It soaked up the espresso syrup nicely and paired well with the cream. The cream was slightly sweet, and the mascarpone definitely reminded me of the flavors of a traditional tiramisu. I either didn’t roll the cake tightly enough or the proportions were off, but I thought there was too much cream with my cake, so use your judgment when you’re assembling the cake. But not gonna lie, I’m pretty sure I finished this entire cake alone. Don’t worry, I scraped off the cream…so that makes it okay, right?

tiramisu-cake-roll-8

Tiramisu Cake Roll
Adapted from Diethood
Makes one cake roll, serves 10-12

Ingredients

For the Cake:
1/2 cup cake flour
5 eggs, separated, room temperature
1 teaspoon pure vanilla extract
1/2 cup plus 2 tablespoons sugar, divided
1/4 teaspoon salt
1/4 teaspoon cream of tartar
4 tablespoons butter, melted and cooled
2 tablespoons powdered sugar

For the Syrup:
1/2 cup brewed espresso
2 tablespoons sugar
1 tablespoon Frangelico or Amaretto

For the Filling:
8 ounces mascarpone cheese
1/4 cup sugar
1/4 teaspoon ground cinnamon
1 tablespoon Frangeico or Amaretto
1/2 cup chilled heavy cream
Cocoa, for dusting

  1. For the cake: Preheat oven to 350F. Lightly spray a jelly roll pan (not a half sheet pan, as that is larger) with baking spray, and line with parchment paper. Spray parchment paper with baking spray as well. Set aside.
  2. In a mixer, beat together egg yolks, vanilla, and 1/2 cup sugar at high speed until thick and pale yellow. Add half of the flour to the yolk mixture, and fold gently. Add in the rest of the flour, and fold it in gently. Set aside.
  3. In another mixing bowl, beat the egg whites, salt, and cream of tartar at medium speed until soft peaks form. Add 2 tablespoons of sugar; beat until the whites hold stiff peaks. Don’t overbeat.
  4. Fold 1/4 of whites into yolk mixture, and repeat until the remaining whites are thoroughly folded in.
  5. In a small mixing bowl, stir together the melted butter and 1/2 cup of the prepared cake batter. Fold the butter mixture back into the cake batter until throughly combined.
  6. Pour the batter into the prepared pan, and spread it evenly, making sure it reaches the corners. Rap the pan on the counter once or twice to get rid of the air bubbles.
  7. Bake the cake in the preheated oven for 8-10 minutes, or until the top of the cake springs back when touched.
  8. Sift powdered sugar over the cake, and cover the cake with a thin tea towel that’s larger than the pan. Place a larger baking pan over the towel, and invert the cake and parchment paper onto it. Gently peel back the parchment paper.
  9. With the towel, roll up the cake from short end to short end with the tea towel inside. Let it cool completely in the towel.
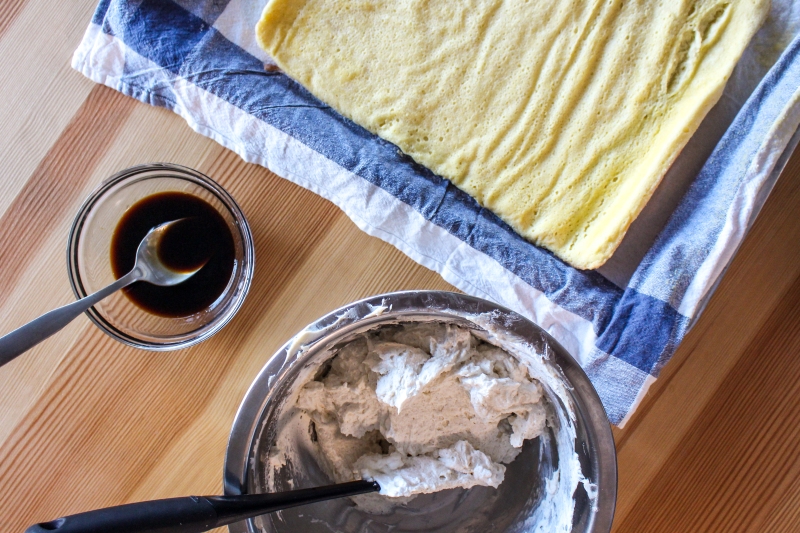
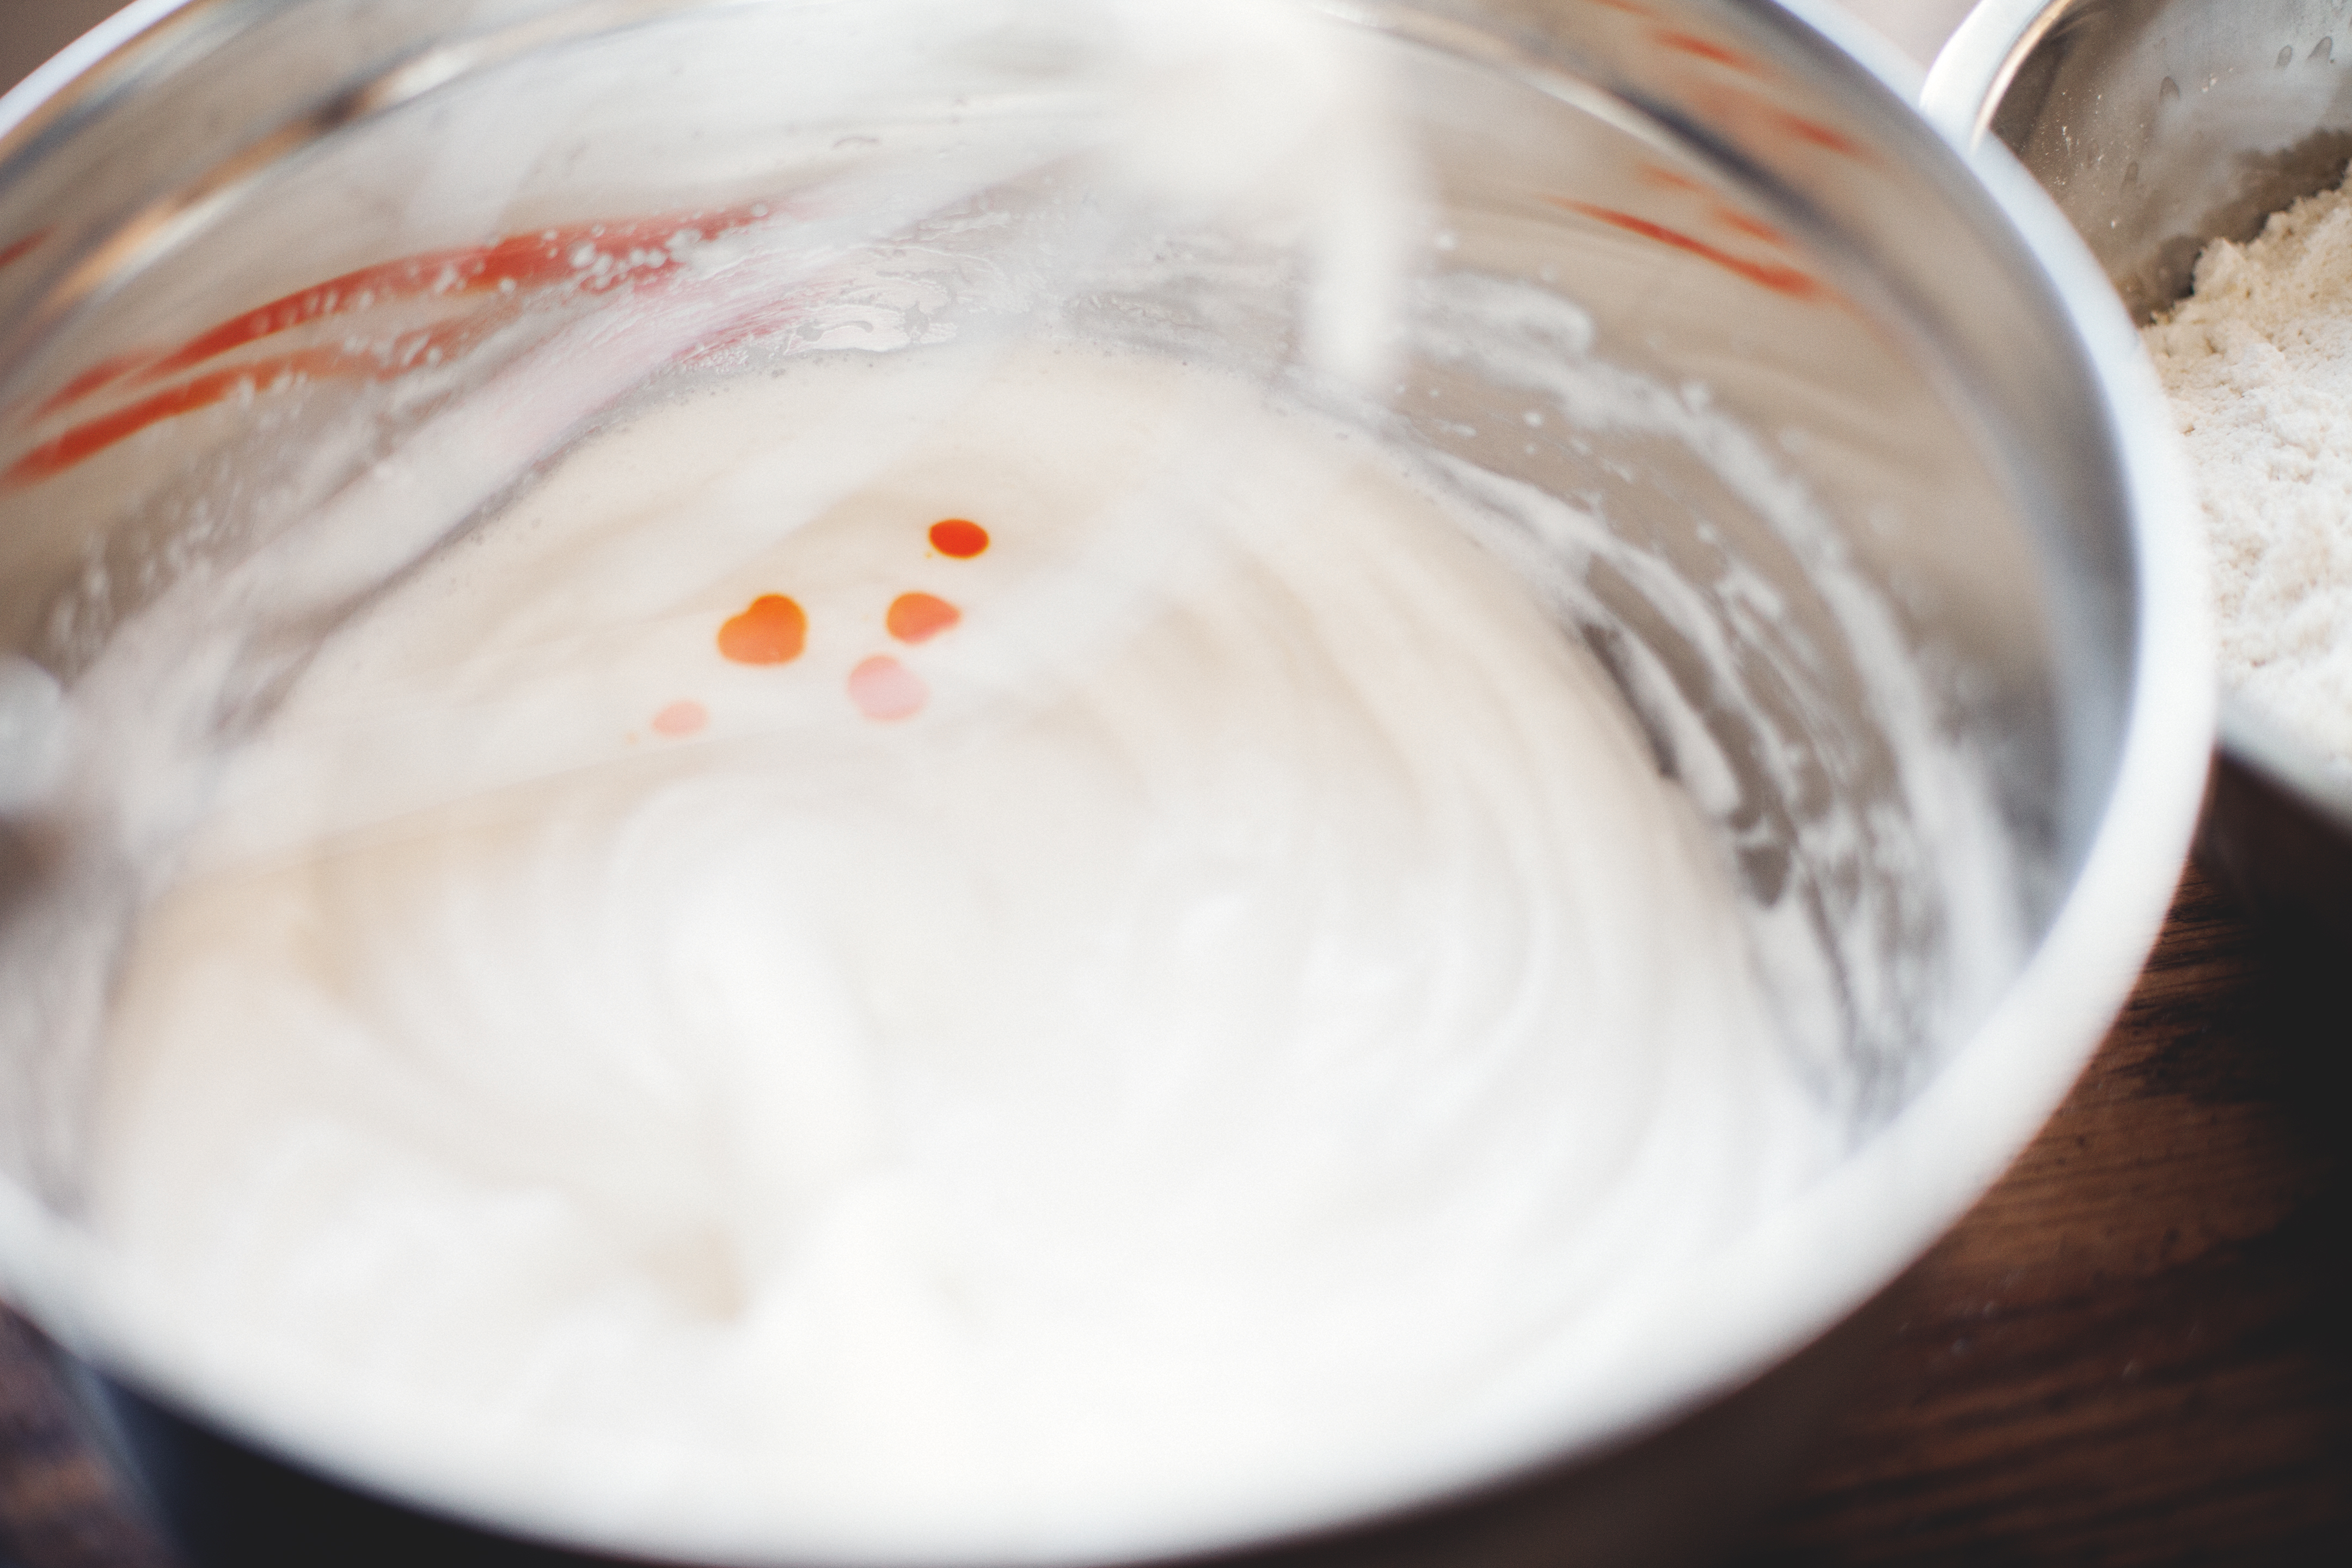
  10. For the syrup: In a small saucepan over medium heat, combine the espresso (I used concentrated instant coffee) and sugar, and bring to a boil. Stirring continuously, boil until the liquid is reduced to 1/4 cup. Remove from heat, and stir in the Frangelico or Amaretto. Let it cool to room temperature.
  11. For the filling: In a large bowl, beat together the mascarpone, sugar, cinnamon, and Frangelico/Amaretto until combined. In another bowl, beat the heavy cream until it holds stiff peaks. Fold the whipped cream into the mascarpone mixture until combined.
  12. For assembly: Gently unroll the cooled cake on a baking sheet. Keep it on the towel.
  13. Brush the unrolled cake with the espresso syrup. With an offset spatula, spread the whipped cream filling evenly over the cake, leaving a 1/2-inch border all around. Without the towel, roll the cake from long end to long end, leaving it seam-side down on your serving platter. Dust with cocoa powder. Cut, serve, and enjoy!

tiramisu-cake-roll-5

Until next time,

Soli deo gloria, and happy reading, eating, and baking!

Baking Through the Alphabet: S is for Strawberry Hand Pies

strawberry-hand-pies-9

I started this blog over three and a half years ago. It’s been a slow run, but it’s coming along.

I told myself that I’d be as transparent with my readers as possible. Because if my goal is to tie together baking with my life and how Jesus has impacted it, I can’t really do so without being honest and open to a certain extent.

strawberry-hand-pies-4

So here it is: breakups aren’t easy.

But sometimes…they’re necessary. It’s easy to be angry and bitter. It’s okay to be emotional and to cry. It’s okay to not be okay.

strawberry-hand-pies-5

What did I gain from this? A lot. From learning how to be empathetic, to not being judgmental, to being more patient and encouraging, to being more open, to taking things easy and not stressing out. From learning the necessity of prayer, to not being so nit-picky, to learning how to actually take care of the person in front of you instead of trying to plan five million steps ahead. From learning the importance of trusting in God (which is a continual struggle), to having Christ as the center of your relationship, to seeking wise counsel, to being a partner. From learning to strive for godliness together, to learning how to make each other better people, to rebuking and molding each other. And this list can go on and on.

strawberry-hand-pies-2

I’m doing okay, in case you’re wondering. It’s hard sometimes, but I know for a fact that it was the best route for us to take–to grow and to be molded separately. And I think that’s what brings peace for me: knowing full well that it was for our good and that it was faithfully ordained by God. It was worth the fight, because it bore fruit during and after the relationship.

strawberry-hand-pies-3

I asked for life experiences when I moved up so I could learn and better minister to others, and this is one of them. So here I am, persevering, praying, and fighting–literally through the love of others and the grace of God.

strawberry-hand-pies-6

Now, it’s a weird transition from talking about my life to talking about strawberries, but I’m going to do it anyway. Berry season is one of my favorite parts of summer, so it only felt necessary to use strawberries for the letter s. Other ideas, if you’re curious: sour cream and onion pretzels, sour cream and onion biscuits…yeah, really not that much.

strawberry-hand-pies-8

I’ve never made a pie before, so I admit that this is the closest I’ve been to making one. But I’m glad I picked hand pies, because they came out so much cuter and were easier to photograph. These pies turned out to be pretty much what you’d expect–sweet strawberries stuffed in a flaky, buttery crust, topped with crunchy raw sugar. The dough can be difficult to work with once the butter starts melting from the warmth of your hands, so work quickly. The trick to flakiness is to have everything cold before it hits the heat of the oven. I tried doing this by working quickly with the dough and leaving the hand pies in the fridge for a couple minutes before throwing them into the oven. Also, the recipe makes enough dough for two batches of hand pies. Don’t forget to cut slits on the tops of the pies to let the steam escape. Just don’t forget to make these delicious pies–berry season is almost over!

strawberry-hand-pies-10

Strawberry Hand Pies
Makes 6 hand pies
Adapted From Martha Stewart

Ingredients:

For the dough/pâte brisée (enough for two batches):
2 1/2 cups all-purpose flour
1 teaspoon salt
1 teaspoon sugar
1 cup (2 sticks) cold unsalted butter, cut into small pieces
1/4 to 1/2 cup cold, ice water

For the strawberry filling:
1 1/2 cups strawberries, hulled and cut in half or quarters
2 tablespoons granulated sugar
1 tablespoon cornstarch

All-purpose flour, for work surface
1 large egg, lightly beaten
Raw sugar, for sprinkling

  1. For the doughCombine flour, salt, and sugar in a bowl (or in a food processor, if using). Add the butter, and, using a pastry cutter, blend until the mixture resembles coarse meal.
  2. Add ice water, tablespoon by tablespoon, until the dough holds together without being wet or sticky. If the dough is still crumbly when you squeeze a small amount together, add a little more water. Be careful to not overwork the dough.
  3. Divide the dough in half. Flatten each half into a disk and wrap in plastic wrap. Chill the dough until needed.
  4. Preheat the oven to 425 degrees F. Line a baking sheet with parchment paper or a Silpat.
  5. For the filling: In a medium bowl, stir together the strawberries, sugar, and cornstarch.
  6. On a lightly floured work surface, roll dough into a large rectangle, about 1/8 inch thick. At this point, you can either cut rounds (and fold them over to make half-circles or top them with another round) or rectangles into sizes you please. I ended up doing rounds topped with another round.
  7. Depending on the size of your round/rectangle, place the strawberry mixture onto the cut dough. Lightly brush the beaten egg around the edge, and either fold the remaining dough over to enclose or top with another piece of dough. Gently press the edges together to seal, crimping the edges with a fork if desired. Brush the tops of each pie with egg, and using a paring knife, cut slits on the top of each pie. This is to ensure that the steam can escape while baking. Sprinkle each pie generously with raw sugar.
  8. Bake the pies until golden brown, about 20 to 25 minutes. Cool slightly before serving.

strawberry-hand-pies

Until next time (hopefully before the end of the year),

Soli Deo Gloria, and Happy reading, eating, and baking!

Hello (Again)!

Hello, readers!

It’s been eight months since I’ve last posted. At this rate, am I still allowed to celebrate my 3rd birthday in January?

I’ll give you a million excuses as to why I haven’t been posting, but maybe it’ll be easier if I give you a recap via a list (my favorite) of important things that have happened. Three important things happened:

  1. My sister got married and I got a new brother (even though he was already a brother to me)!
    15_Tiff&Ray_Wedding_329

    Picture Credit: Kyle Ng Photography

    It was such a precious moment to witness my sister marry her other half, but even sweeter to see their wedding used as a testimony of God’s work in their lives. There were so many tears (I think I won in terms of amount of tears shed), but I promise you they were happy tears. It was definitely one of the best days of my life. Here’s a little excerpt from my maid of honor speech:

    “Jieh–I tell you this every time I’m home for the weekend, to which you always respond with “okay” or “gross”–but I love you. You know me inside and out, you’re always there to rebuke me and call me out when I’m being stupid. You have such a big heart for others, and you always put their needs above your own. I admire you so much, and I’ve strived for the past 21 years to be half as amazing as you are…and I don’t even come close. Thank you for being my sister, best friend, and unofficial discipler. You’ll literally be 10 minutes away from home–but I’ll miss you. ‘Roomies no more,’ as you call it. I’ll miss making Friends/The Office references with you, seeing you when I’m home, stealing your clothes and make up and ‘forgetting’ to bring them back home, having sleepovers with you (which really just end up being you falling asleep within the first five minutes and me moving back into my own bed because you’re totally knocked out), and my favorite–taking ugly pictures of you when you’re sleeping and posting them on Facebook. Thank you for teaching me what it means to love others like Christ has loved us. Thank you for your words of wisdom, for being such a great role model…for being my sister.”

15_Tiff&Ray_Wedding_354


2. I turned 22! Cue something about not knowing about you and feeling twenty-two…
IMG_8939

3. I said goodbye to the better part of California (for now…just kidding) and moved up to NorCal. I said goodbye to my family, my community, my church, my job, my roommates–basically everything I knew in SoCal. I moved up here for two reasons: 1) work and 2) experience. I’m really having a blast up here, and I really do love the environment and culture in what people call “yay area” (and I can see why). But I’d be lying if I said it was easy. Things are a lot better than I had expected, but I still have those random days when I’m confused about everything that’s going on. “Why am I up here? What am I doing at work, and where will this job take me? How am I growing in church; how am I growing as an individual and follower of Christ?” etc etc. I know moving isn’t that big of a deal, but I think with my background and my personality, it’s hard moving somewhere 350 miles away with no family near you. Can you imagine if I had moved out of state, or even out of the country…?! Regardless where I am, it’s an experience that I am thankful for. My plans up here keep changing in terms of housing and church, and I know that they will continue to change, and I will forever be a nomad until I settle down. One thing that does remain constant, though, and you’ve seen me repeat that over and over again on this blog, is that God is faithful. I don’t know my plans, but I believe that He is sovereign and has a purpose for me every step of the way. Something I’ve been meditating on recently (and I’ll end it here):

“Blessed be the God and Father of our Lord Jesus Christ! According to his great mercy, he has caused us to be born again to a living hope through the resurrection of Jesus Christ from the dead, to an inheritance that is imperishable, undefiled, and unfading, kept in heaven for you, who by God’s power are being guarded through faith for a salvation ready to be revealed in the last time. In this you rejoice, though now for a little while, if necessary, you have been grieved by various trials, so that the tested genuineness of your faith—more precious than gold that perishes though it is tested by fire—may be found to result in praise and glory and honor at the revelation of Jesus Christ. Though you have not seen him, you love him. Though you do not now see him, you believe in him and rejoice with joy that is inexpressible and filled with glory, obtaining the outcome of your faith, the salvation of your souls.” 
– 1 Peter 1:3-9


IMG_5275
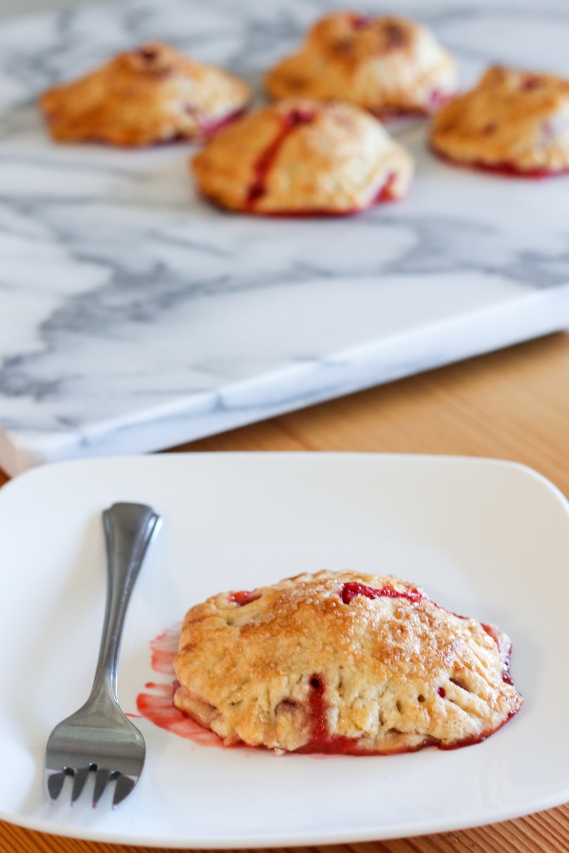
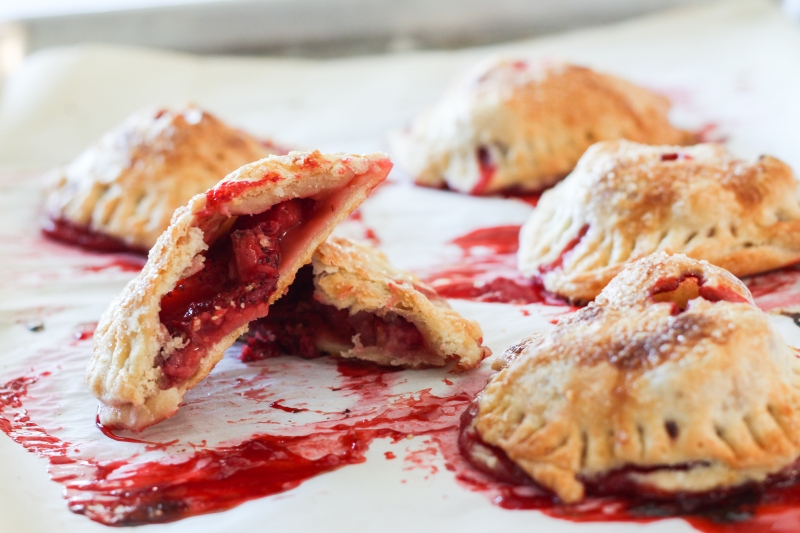
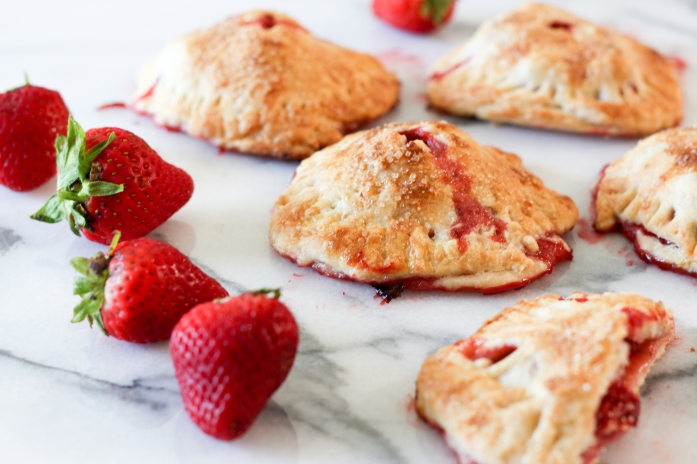
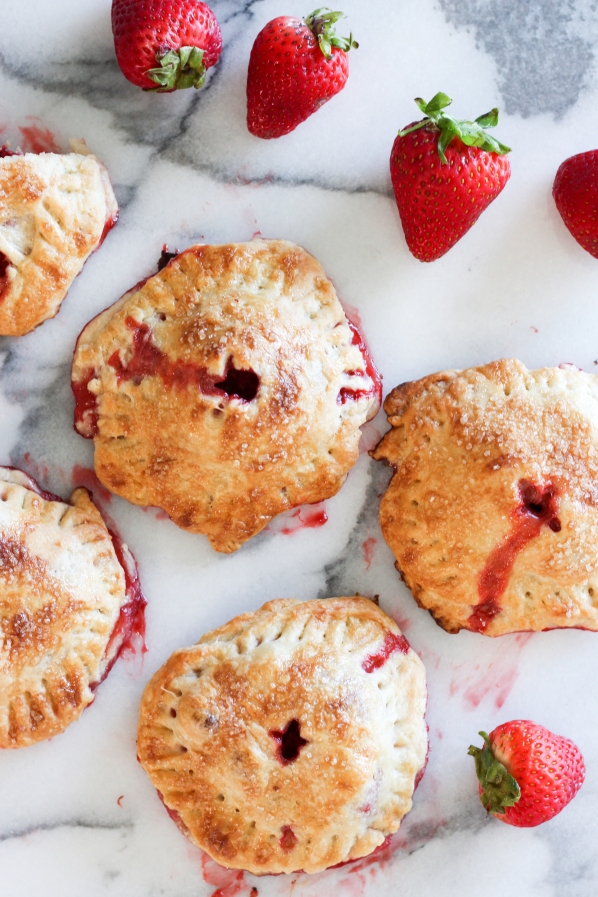
At the end of the day…this is still a baking blog, and I’m sure you’re all here on this site more for the baked goods rather than my life stories and trials, so here are some things I’ve made during the past eight months. For the record, I’m still going to try to finish baking through the alphabet. I had three failed attempts on the letter ‘o’, so maybe fourth time’s the charm?


IMG_5648
IMG_5839 IMG_5919 IMG_5960IMG_6828IMG_5257

I’d really love to keep this thing going. I’m not resigning quite yet. But realistically, it’ll be hard for me to keep this going consistently, so my promise is that I’ll do my best. So to my friends up here, if you have an open kitchen to let me experiment in (caution: I can be a messy baker)…let me know :)


Until next time,

Soli Deo Gloria, and Happy reading, eating, and baking!


Baking Through the Alphabet: N is for Nutella Banana Cake (and gracefulleats is two!)

Birthday Cake-1

I’m two!

It’s been two years since I started this baking venture called gracefulleats…and I must say, it’s been a challenge.

Birthday Cake-14

During this second year, I’ve: been featured in BuzzFeed, here and here; had my earl grey donuts with blueberry glaze featured in a German magazine called Sweet Dreams Magazin; finished seven letters of my alphabet, eight including this one (what a horrible record…); and you know, made the usual random cookies and cupcakes for bible studies, road trips, and friends/family. This year seemed so much more unproductive. The amount of posts on here seems to decrease as time goes by, and I don’t know whether or not I should contribute that to busy-ness or laziness. Perhaps both?

Birthday Cake-8

There are times when I think about stopping this whole thing altogether. I tell myself, “It’s too much work, you’re wasting your money, no one really ever reads this thing, you’re not that good at this stuff anyway,” etc etc. But the amount of support and encouragements I get from friends and family is amazing. They push me to keep going, to keep doing what I love, to keep pursuing this hobby of mine. They send me links to help me with my photography and composition, recipes for me to try, and blogs for me to look for inspiration. They ask me why I haven’t blogged, then tell me that I need to finish the alphabet (and I will! Eventually). They tell me how they’ve used recipes from my blog, which always makes me a little nervous because I know I make grammar mistakes and typos all the time. But…you all know who you are–thank you.

Birthday Cake-12 copy

But as I was thinking about this post, I realized this: there’s a much greater purpose behind this blog. There’s a greater purpose behind sharing recipes with people who I’ll probably never meet. There’s more to just finding recipes, making baked goods, taking pictures, and writing blog posts. There is a far greater purpose as to why I do what I do on here. And it’s the gospel. The gospel–the story of how our Sovereign Creator sent His son, Jesus, to die on the cross for our sins. The story of unconditional love and everlasting joy. The story that, if we believe it, gives us eternal life in heaven to sing His praises forever. The story that gives us delight, hope, and peace…in His name and for His glory.

Birthday Cake-2
My prayer is that as long as I keep living for Christ, for the gospel, this mindset may be reflected in my posts. As for how these posts will reach out to others, I’m not really sure. But I’m certain that God is good and faithful, and He will do what He pleases. I will continue to be His servant and a missionary for Christ, knowing full well that I am a child of God and that He does all things for my good. And I will continue to do this, as with all other things in life, for His glory…because that is what I was created to do.
Birthday Cake-11

So, thank you, all, for your support and encouragement. Thanks for staying with me on this journey the past two years! Soli deo Gloria.

Birthday Cake-3

As for this cake, this was probably one of the most troublesome cakes I’ve ever made…I practically messed up all the way through. First, I couldn’t find one of my cake pans, so I only had one 6-inch pan to work with, which meant I had to bake each layer separately, one after the other. Everything was all good, but then realized I put in two sticks of butter instead of one, which explained why each layer took almost an hour to bake and why it came out soo oily and dense (which, by the way, ended up being okay!). Then, I didn’t slice each layer in half evenly, so one of the layers was too thin and completely split in the middle while I was trying to assemble the cake. I had to pull that layer out, which became a great snack, haha. By the time I was finished, it was almost sunset–seriously, the whole day was a fight against the clock to get pictures in before the sun went down. Despite all the bumps, everything turned out okay, and now I have a cake ready for my post! The backstory behind this cake really reflects how I am in the kitchen–a klutz and a “messer upper”, but somehow things end up minimally okay.
Birthday Cake-10
In terms of the recipe, the banana cake was good. It came out really dense, which may have been a result of using an extra stick of butter. The banana flavor was really strong, and it sort of overpowered the Nutella aspect of the cake. The buttercream wasn’t as intimidating as I thought it would be, considering how it required cooking the egg whites, but it definitely needed more Nutella. I really liked the chocolate ganache with the cake; my only thing is that it overpowers the Nutella, which is supposed to be the star of the cake. When I was layering my cakes, I spread a layer of Nutella, then the ganache, then chopped hazelnuts, then the buttercream. It did get pretty rich, though. I liked the crunch from the nuts, and I wanted more Nutella flavor, but feel free to do whatever works for you! I’d say this cake was a success despite all my bloopers–I definitely want to try this again. Hopefully you’ll fare better than I did :)
Birthday Cake-9Nutella Banana Cake
Makes one 6-inch layer cake
Adapted from The Cake Blog

Ingredients:

For the Banana Cake:
3 ripe bananas, mashed
1/2 cup (1 stick) unsalted butter, softened
1 cup sugar
2 eggs
1 teaspoon vanilla extract
1/2 cup plain Greek yogurt or sour cream
1 1/2 cups all purpose flour
1 1/2 teaspoons baking powder
1/4 teaspoon baking soda
1/2 teaspoon salt

For the Chocolate Ganache:
8 ounces semi-sweet chocolate chips
6 ounces heavy cream

For the Nutella Swiss Meringue Buttercream:
3 egg whites
1 cup sugar
1 1/2 cups (3 sticks) unsalted butter, softened
1 teaspoon vanilla extract
1/4 cup Nutella (i didn’t think this was enough, you may want to add more)

1. For the Banana Cake: Preheat the oven to 350 degrees F. Prepare two 6-inch round cake pans by spraying with cooking spray and lining the bottom with a cut out 6-inch parchment paper circle.

2. In a medium bowl, sift together the dry ingredients. In the bowl of an electric mixer, using the paddle attachment, beat the butter until smooth. Add in the sugar, and cream until light and fluffy.

3. With the mixer on low, add in the vanilla and eggs, scraping down the sides and bottom of the bowl after each addition.

4. Add in half of the sifted dry ingredients. Mix in the yogurt or sour cream. Add in the rest of the dry ingredients, and mix until just combined. Fold in the mashed bananas until just combined. Don’t overmix.

5. Pour the batter evenly between two pans, and bake until golden, about 22-25 minutes. Let the layers cool on a wire rack, inverting them once they are cool enough to handle. Let the cakes cool completely before slicing them in half horizontally to create four layers of cake.

6. For the Chocolate Ganache:  Place the chocolate chips in a heatproof bowl. In a small saucepan, heat the cream over medium-low until it starts to simmer. Pour the cream over the chocolate, and let it sit for 30 seconds before whisking together until smooth. Let the ganache cool before using.

7. For the Nutella Swiss Meringue Buttercream: Place the egg whites and sugar in the bowl of an electric mixer. Whisk until combined.

8. Using a saucepan that fits the mixing bowl without the bottom of the bowl touching the water, fill the saucepan with a few inches of water and place over medium heat.

9. Place the bowl over the saucepan, making sure the bottom doesn’t touch the water. Heat the egg white/sugar mixture, stirring occasionally, until the egg mixture reaches about 110 degrees on a candy thermometer.

10. Once hot, remove the bowl from the heat, and place it on the mixer. Whisk on high until the bowl becomes room temperature, and the egg white mixture reaches stiff peaks.

11. Switch out the whisk attachment for the paddle attachment. Add in the vanilla, butter, and Nutella, and beat until smooth. If using the buttercream the same day, keep it at room temperature.

12. For Assembly: Spread a layer of ganache over the bottom layer of the cake. Remember, I also added a layer of Nutella, but this cake does get pretty rich, so it’s your call.

13. Sprinkle some chopped hazelnuts over the top of the ganache, then add a layer of buttercream on top of the ganache. Place the second layer of cake on top of the buttercream, and repeat until all your layers are done. Ice the cake with the remaining buttercream, and garnish with toasted hazelnuts. Enjoy!
Birthday Cake-13
Until next time,
Soli Deo Gloria, and Happy reading, eating, and baking!
P.S. Extra thanks to Samantha Ho for editing my pictures!

Baking Through the Alphabet: L is for Lemon French Macarons

IMG_5318 copy

Guess what–

I’m officially a college graduate!

IMG_4487

(pc: Raymond Tay)

In the past three years, I’ve moved away from home, grown tremendously at a home church and found a new one along the way, built and lost friendships and relationships, met great brothers and sisters who’ve impacted me more than they’ll ever know, lived with roommates who I can’t imagine life without (holla, 1128!), learned a lot less about business economics than I would have expected, gone through probably 50 pounds of butter and hiked up the electricity bill, gotten a job which I’ll probably stay at for the next few years at least, joined an on-campus fellowship which I am very thankful for, had a strong support system back at home (and gained a future brother-in-law too!), hermit-ed and broken out of my shell (though it’s still a work in progress), started a food blog, and so many more things that I would like to say but shouldn’t list out here.

But if there’s one giant theme for my time in college, it is that God is faithful. He was faithful in bringing me to UCI, faithful in constructing every single second of my life, faithful in bringing me to where I am today. I am here today by the gospel, and it is by grace that I have been saved (Ephesians 2:8). Life is tough, but there is joy and comfort in the gospel. And at the end of the day, I have my salvation; God was, is, and will forever be sovereign over all things…and that is something to be thankful for.

IMG_8990-25
(pc: Samantha Ho)

ZOTZOTZOT forever.

This post is a special one–it’s the first collaboration project I’ve ever done with someone. And guess when I actually made these goodies…February. Yep, half a year ago. Laggy to the max, sorry! But Ryan Kim is one of the most down to earth people I’ve ever met. He’s incredibly talented, and that’s perfectly clear if you look through his portfolio. He took photos of the entire process step-by-step, from beating the egg whites, to piping the shells, to filling the macarons with lemon curd icing. He was patient even as I asked questions about all his camera equipment and life, I guess, and even when I spilled powdered sugar all over my kitchen. He definitely knows his stuff, and it was fun getting to know him with this project.

IMG_5306 copy

Anyways, Ryan, if you ever read this, it was a joy collaborating with you on this one! Thanks for all the photos and for making my food look better!

Like I mentioned in my last macaron post, these things can be a little tricky, but there’s nothing to be scared about. I wrote my own tips on the other post, so I won’t be typing them again here. But you can definitely check it out here if you’re curious!

IMG_5312 copy

Lemon French Macarons
(Photo Credit: Ryan Kim)
Makes about 70-1.5 inch shells (35 sandwiches)
Macaron recipe from Not So Humble Pie, Lemon Curd from A Baked Creation

Ingredients:

For the macarons:
120g almond meal
200g powdered sugar
100g egg whites, at room temperature
1/4 teaspoon cream of tartar
30-35g granulated sugar
4-6 drops yellow gel food coloring

For the filling (needs to be made ahead of time):
3 egg yolks
1/2 cup sugar
Fresh lemon juice from 1/2 large lemon (about 2-3 tbsp)
zest from 1/2 large lemon
1/2 stick cold unsalted butter, sliced

Note: For almond meal, you can grind up your old almonds, or you can buy the almond flour/meal itself. I usually buy slivered almonds in bulk at Winco and grind them myself, but sometimes I use the almond meal from Trader Joes–$4.99/lb bag.

1. For the macarons: Line 2-3 baking sheets with parchment paper or silicone liners. Prep a piping bag with a round tip. Place the bag into a tall drinking glass and cuff the bags opening over the top (this makes it easier to fill the bag).

IMG_5177 copy
IMG_5183

2. In a large bowl, sift the almond meal to remove any clumps, then weigh out 120g. Some people like to weigh then sift, but I always end up with so many extra lumps/chunky nuts that won’t go through the sieve that I don’t want to be inaccurate in my weights. Sift then weigh.

IMG_5193 copy

3. In another bowl, sift the powdered sugar to remove any clumps, then weigh out 200g.

4. Mix together the powdered sugar and almond meal. You can sift both of them again, but I usually don’t, and my macarons turn out fine. Sifting it together makes sure that they’re evenly incorporated with each other, but I just stir with a spoon.

IMG_5165 copy

IMG_5195 copy

5. Pour the 100g of egg whites into a large stainless steel mixing bowl. Add the cream of tartar. Begin beating the eggs on low speed. Once they are very foamy, begin sprinkling in the sugar as you beat. Increase the speed if necessary, and beat the meringue to stiff glossy peaks. Read here if you’re confused about what this means.

IMG_5208 copy

IMG_5215 copy

6. If you’re using food coloring, make sure you are using gel food coloring. Add it in at this point (add more or fewer drops if needed), and whip for a few seconds.

IMG_5225 copy
IMG_5236 copy

7. Add about 1/4 of the almond and sugar mixture; fold with a rubber spatula until no streaks remain (make sure you fold! Don’t stir. It’ll deflate the whites). Continue to add the almond and sugar mixture in quarters, and fold until you reach the proper batter. It is finished when you pick up your spatula and the batter flows steadily.  People describe this as lava-like or molten, but I never really understood what this meant… SO it needs to be thick enough that it will mound up on itself, but also fluid enough that it will melt back down after 20 seconds.

IMG_5253 copy

IMG_5255 copy

8. Pour the batter into the prepared piping bag, and pipe rows of batter onto the baking sheets. Make sure you don’t pipe them too close to each other, because they may spread.

9. Rap the baking pan on the counter to get rid of any air bubbles. If you want, you can pop the air bubbles that come up with a toothpick.

IMG_5256 copy

10. Let the macarons rest or “dry” on the counter until they are no longer tacky to a light touch. I know they are ready when I touch it and nothing gets on my finger. It usually takes at least 30 minutes for me, but it depends on the humidity and weather. Try to let them dry in a cool place.

IMG_5292 copy

11. When your macarons are almost dry, preheat the oven to 290°F. Bake the macarons on the middle rack of your oven (this depends on your oven). I usually bake one tray at a time.

IMG_5294 copy

12. Bake the macarons for 16-20 minutes. When they are done, let them cool completely on the sheets. Once the macarons are completely cool, peel them off by pulling back the parchment paper/silicone mat. The shells should come off easily. If not, put them back in the oven for 1-2 minutes.

IMG_5275 copy

IMG_5286 copy

13. For the filling: Place the metal bowl on top of the saucepan and stir with a rubber spatula or wooden spoon. The mixture will begin to thicken in about 10 minutes. Turn off the heat; whisk in the sliced butter. Wait for the slice to completely melt before adding the next one. Pour the lemon curd into a glass jar/container, and let it cool. Refrigerate overnight before using.

IMG_5302 copy

14. For Assembly: Match up each shell. Fill a pastry bag filled with the lemon curd. Pipe a small mound of the lemon curd into the center of the shell, then sandwich each shell with its other half. Do this for all the shells.

IMG_5304 copy

IMG_5306 copy

15. You have two options now: a) Eat them all. b) Put them in the fridge, and let the flavors develop overtime. I usually just leave them overnight, since I’m always baking at night. Leave the macarons in the fridge when you’re not eating them, then when you’re ready to serve/consume them, let them warm up a bit so the macaron can soften. Or eat them straight from the fridge, like me. Your choice =).

IMG_5323

Goodbye, college.
You went by a little faster than I had expected, but it’s okay.

IMG_8991-26

Now it’s time to grow up.

DSC_3858
(pc: Timothy Lam)

10298320_10152180572741279_8024119919660684882_o
(pc: Ce)

Until Next Time,

Soli deo Gloria, and Happy reading, eating, and baking!

Baking Through the Alphabet: K is for Kahlúa Crème Brûlée

IMG_1966

IMG_1946

Hello, friends! It’s been a while (as usual). Things have been a bit hectic the past few weeks, sorry! But they’re good things, I promise.

IMG_1951

IMG_1936

I started this post two and a half weeks ago. I still can’t figure out how to start this, so here I go with the bullet points again:

  • I’m graduating in less than two weeks, eeek! I’m ready for school to be over (senioritis level has been at 100% this past quarter…), but not ready for friends to move back home. I think that’s something I’ve been really thankful for this past quarter, the community of friends.
  • #glmcnation, that is all. More on this eventually.
  • The Office Project. Don’t laugh at me, but I started this project where I post something related to The Office every Wednesday, aka I either recreate the scene, or I do something similar to it. Probably makes no sense right now, but it’s a way for me to have fun, share my love for the show, and test my creativity. Maybe I’ll post a picture on here sometime.

IMG_1963

  • I’ve been listening to two things recently: 1) Kishi Bashi’s new album, Lighght, and 2) Ellensburg. Ellensburg is an album from Resonate Church, who also has this really good hymns album out, called The Hymns Record. Anyway, a few lyrics have been stuck in my head: “But God, rich in mercy…” / “He rolled away the stone, death has been dethroned” / “Jesus, Jesus, Jesus, the sweetest Name I know.” These lyrics have stuck out to me because I think they hold so much truth–God’s unfailing love and unending mercies, the power of the Resurrection, and JESUS. There’s been a lot of uncertainty going on, not so much uncertainty in getting a job/grad school, but more so in what’s going to happen next in life for me. I’ve graduated college (or graduating, I should say), I’ve gotten my full-time job–so what’s next? It’s easy for me to be discontent in where I am, but I am reminded to not only be thankful, but also to just trust in God. He has a plan for me, and I don’t know what, but I know for a fact that He works all things for my good (Romans 8:28). He is merciful, He is just. He is good.
  • 2 Corinthians 4:16-18: “So we do not lose heart. Though our outer self  is wasting away, our inner self is being renewed day by day. For this light momentary affliction is preparing for us an eternal weight of glory beyond all comparison, as we look not to the things that are seen but to the things that are unseen. For the things that are seen are transient, but the things that are unseen are eternal.”

IMG_1934

IMG_1950


In addition to taking forever to come up with something to write about, it took me forever to figure out what to bake for the letter K. I settled on Kahlúa and was set on making Kahlúa cheesecake swirled brownies. It did not taste good (in the voice of Judy Geller when Rachel makes the trifle). I put too much Kahlua, and the cheesecake to brownie ratio was off…SUPER OFF. Round two, some other day.

IMG_1957

IMG_1952

I partially settled on crème brûlée because I had extra egg yolks and heavy cream sitting in the fridge. And it worked out well! The Kahlúa flavor was prominent–so if you’re not a super big fan of Kahlúa, I would reduce it a little bit. It was creamy and silky, not too sweet, and had a nice kick at the end. I approve!

IMG_1960

Kahlúa Crème Brûlée
Makes 4-6 ramekins
Adapted From Being Suzy Homemaker

Ingredients:

2 cups heavy cream
1/3 cup white sugar
6 egg yolks
1 teaspoon vanilla extract
3 tablespoons Kahlúa (I used Hazlenut Kahlúa)
6 teaspoons sugar

1. Preheat the oven to 300 degrees F. Place ramekins in a roasting pan/deep baking dish at least 3 inches deep.

2. Stir together the cream and sugar in a medium saucepan over medium heat. Cook until very hot, stirring continuously until sugar dissolves.

3. In another bowl, whisk together the egg yolks, vanilla extract, and Kahlúa until combined. Slowly add 1/3 of the cream mixture, 2 tablespoons at a time, while still whisking (you want to temper the eggs and not cook them). Stir in the remaining hot cream slowly.

4. Pour the custard into the ramekins. Fill the roasting pan with boiling water halfway up the sides of the ramekins.

5. Bake for 35-45 minutes, until the custard is set around but still slightly jiggly in the center. Let the custards come to room temperature, then cover and refrigerate for four hours, or until cold.

6. When ready to serve, let the custards come to room temperature. Sprinkle sugar on each to coat the top. Then, using a hand torch, melt the sugar until it forms a crispy crust. Serve immediately (or soon!).

Until next time,

Soli Deo Gloria, and Happy reading, eating, and baking!

IMG_1949

IMG_1967

IMG_1968

Baking Through the Alphabet: I is for Irish Cream Bread Pudding

IMG_8029

Do some songs just remind you of certain moments?

IMG_8017

Like for me, Anberlin will always remind me of high school. Especially when “Pray Tell” kept running through my head during my Calc BC test junior year.

“Beautiful People” by Marilyn Manson (or any song by him) will always remind me of Drama 16…the parts that I did manage to stay awake in, at least. (Thanks N and W for being my friends in this class!)

“Souvenirs” will always remind me of finals week, fall quarter, freshman year…and basically what really sparked my Switchfoot obsession.

“Holding my World” by Kristin Stanfill will remind me of when I got rejected from UCLA. Truth that I needed, though. More on that later.

IMG_8041

I think baking is the same way. There are just some things that hold so much significance to them.

IMG_1545

Asian steamed buns will always remind me of my childhood, because that was something I always made with my mom.

Oatmeal raisin cookies will always remind me of my grandpa, because that was his favorite, and every time he visited, I made sure he had a batch of those waiting for him.

Cinnamon rolls will remind me of my apartment, Samoas my sister, cheesecake my mom, etc. There’s something to everything.

IMG_8013

This one does the same, and it’ll always remind me of work.

IMG_1547

I remember this one day I was sitting at the table in our office kitchen with my coworkers, and I was telling them how I couldn’t think of what to do for the letter “i.” I’m doing this whole entire alphabet thing based on the main ingredient/flavor. For example, if I made Thin Mints Cupcakes (which I did actually, post coming…eventually), they’d be filed for the letter “t” and not “c” because Thin Mints is the main ingredient. I couldn’t think of a main ingredient that started with “i.”

IMG_8027

…Anyways, my coworker T suggested this bread pudding recipe that used Baileys and chocolate. I had no idea what Baileys was, and she explained that it was this Irish cream liquor with a coffee flavor. She gave me the recipe, the Baileys, and the idea for this post. I don’t think you’ll ever read this, T, but this one’s for you! =)

IMG_8021

IMG_8015

I was a little iffy about bread pudding because I’d much rather eat the bread by itself (I’m a major carbs fan, in case I haven’t mentioned it yet). But I figured that this would be a good addition to this alphabet mix, so I went for it. The end result? YUM. A little too rich for my taste, but definitely comforting. French bread cubes soaked in a custard, mixed with white and dark chocolate chips, baked in little ramekins to perfection, then topped with a sweet Irish cream sauce. I think it’d go really well with vanilla ice cream too! But I didn’t have any…boo.

IMG_8022

Three notes though, 1) More dark chocolate chips next time, and maybe less white chocolate chips, 2) You can get little Irish cream bottles at BevMo! You need two of those little bottles (they’re so cute!). You won’t use all of it, but I just poured the leftover liquor into the custard sauce, and 3) Less Irish cream sauce. I’d probably cut that part of the recipe in half because I had so much leftover. I didn’t want it too rich, so I didn’t drizzle as much cream sauce over the bread pudding. It’s your call though. If you cut the cream sauce recipe in half, you have some Irish cream liquor to put into the custard sauce.

IMG_1550

Irish Cream Bread Pudding
Makes 8 ramekins
Adapted From Epicurious

Ingredients:

For the Sauce:
1 cup whipping cream
3 tablespoons Irish cream liquor (Baileys)
2 tablespoons sugar
1/4 teaspoon vanilla extract
1 teaspoon cornstarch
1 tablespoon water

For the bread pudding:
14 cups 3/4-inch cube French bread with crust (about 12 ounces)
4 ounces white chocolate, chopped or chips
8 ounces dark chocolate, chopped or chips
4 large eggs
3/4 cup sugar, separated
2 teaspoons vanilla extract
2 cups whipping cream, separated
1/2 cup whole milk

1. For the sauce: Bring the cream, liquor, sugar, and vanilla to boil in a small saucepan over medium-high heat, stirring frequently. Mix the cornstarch and 1 teaspoon water in a small bowl to blend, then whisk it into the cream mixture. Boil until the sauce thickens, stirring constantly, about 3 minutes. Cool, cover, and refrigerate until cold, at least 2 hours.

2. For the bread pudding: Combine the bread and chocolates in a large bowl, and toss to blend. In another large bowl, beat the eggs, 1/2 cup plus 2 tablespoons sugar, vanilla, and leftover Irish cream liquor. Gradually beat in 1 1/2 cups cream and milk. Add the cream mixture to the bread mixture, and stir to combine. Really combine it so the bread can soak in all the custard. Let it stand for at least 30 minutes.

3. Preheat the oven to 350°F. Prepare the ramekins by spraying with nonstick spray. Scoop the bread mixture into the prepared ramekins (or if you want, a 13x9x2-inch glass baking dish). Drizzle with remaining 1/2 cup cream, and sprinkle with remaining 2 tablespoons sugar. Bake the pudding until the edges are golden and the custard is set in center, about 1 hour. Let the pudding cool slightly.

4. Drizzle the pudding with the Irish cream sauce, and serve warm. Enjoy!

 IMG_8025

Holding my World. I sort of stopped listening to that song for a while, but it came back on my playlist the other day, and it reminded me so much about really trusting in God. I first heard this song this one Friday night at our high school fellowship group back in 2011. I had just gotten rejected from UCLA, which was my number one choice (even though a part of me knew I wouldn’t get in), so I was definitely bummed. But these lyrics spoke so much truth to me:

So I will not worry or fret
My God is the God who will never forget
All of His goodness and all of His promises
He’s holding my world in His hands

I was reminded that God is always good and He is always sovereign through my trials. At that moment, it sucked that I didn’t get into UCLA, but God is good because I ended up here at Irvine, and life is good. I’ve learned plenty, met great friends, have a stable job, and live with wonderful roommates. I’ve found accountability and loving brothers and sisters here who always care and love me. God was good, and He will always be good. He had a plan for me to be here at Irvine, and He has a plan for everything else in my future. Note to self: be patient and trust in God.

IMG_8033

Until next time,

Soli Deo Gloria, and Happy reading, eating and baking!


Baking Through the Alphabet: G is for Garlic Parmesan Bread Knots

IMG_1073

Oops, I lagged again! Forgive me, please.

IMG_1078

I’ve been super lazy about blogging (and pretty much everything else, actually). BUT I have been baking and the pictures are sitting on my laptop waiting to be edited.

IMG_1055

Actually…did I mention I got a job? I work full-time at the same place I was a student worker at, and I’m a part-time student for the next two quarters until I graduate in June (thanks 2014 for letting me crash your party!). I work 40 hours a week, and I am actually really enjoying the working life. I’m definitely not a big fan of studying or school, and I really like just being able to come home at 5 and…relax. I’m sure I have it easy now, because I know I’ll have many more responsibilities once I’m married, have kids, etc. But for now, I’m just going to enjoy it.

IMG_1069

I’m really thankful for my job, and sometimes I forget to remind myself how lucky I am to have this job. Everything for this job just fell into place…the timing worked out really well. I was mentioning to my boss (who is also a Christian and is a pastor’s wife) the other day how lucky I was to have randomly met my friend Heidi (who introduced me to the student position). I was telling her how lucky I was to have everything work out so smoothly. But she reminded me that it wasn’t pure luck, it was God who had everything planned out. It was my sovereign creator who had allowed everything to happen the way it did. And I am so thankful.

IMG_8322

[Look! My coworkers got my flowers for my new office :’) ]

IMG_1055

Anyways,

IMG_1057

Garlic Parmesan Knots. Soft, bread-y knots topped with garlic, butter, fresh parsley, and parmesan cheese. It’s sooo yummy. It’s a little hard to tie the dough into knots, but after a few you get the hang of it. After you do that, you bake the knots, then you toss them in a garlic/butter/oil/parsley mixture and top them with freshly grated parmesan cheese. Eat them while they’re warm!

IMG_1090

Garlic Parmesan Bread Knots
Makes about 40 knots
Adapted From White on Rice Couple

Ingredients:

For the dough:
1 3/4 cup warm water
1/4 cup extra virgin olive oil
1 teaspoon salt
1 tablespoon sugar
1 1/2 tablespoons instant yeast
about 5 1/2 cups all-purpose flour

For the Parmesan-Garlic Coating:
1/4 cup unsalted butter, melted and slightly warm
1/4 cup extra virgin olive oil
5 cloves garlic, crushed
1/2 cup freshly grated Parmesan cheese
1/4 cup chopped Italian parsley
salt and pepper, to taste

1. To make the dough: Combine the warm water, olive oil, salt, sugar, and yeast in a large bowl. Add the flour and mix and knead to incorporate all the ingredients. Cover the bowl and set it in a warm spot to proof until doubled in volume.

2. If you want, you can chill the dough for a few hours to make it easier to handle. I didn’t have time so I skipped this step.

3. Prepare baking sheets by lining them with parchment paper.

4. For the knots, pinch off and weigh 1 oz (28g) balls of dough. Weighing helps keep the sizes consistent. Roll the dough ball back and forth to create an even rope about 6-inch long. Tie the rope into a knot (over, under, and through), and place the knots onto the lined sheets. Allow about 1 1/2-inches between each knot. If the dough gets too sticky, you can add a little flour. Be careful to not add too much flour or the knots will come out dry. Let the knots rise on the trays until doubled in size before baking.

5. Preheat the oven to 400° F. 

6. When the knots have doubled in size, bake the knots in the oven for about 12-15 minutes or until golden brown.

7. While the knots are baking, prepare the coating. Mix together the warm/hot butter, olive oil, parsley, and garlic (If you want a stronger garlic flavor, you can melt the butter with the olive oil and garlic in a small saucepan). Add salt and pepper to taste. Set aside.

8. When the knots are done and still warm, toss the knots with the garlic coating, then top with parmesan cheese. These taste best when warm, but you can always heat them up in the microwave for a few seconds if they get cold. Enjoy!

IMG_1061

IMG_1058

Until Next Time,

Soli Deo Gloria, and Happy reading, eating, and baking!

gracefulleats is one! (plus Chocolate Cake with Vanilla Buttercream)

IMG_0966

I’m taking a break from my alphabets for today, because…

gracefulleats is one!

IMG_0913

It’s been exactly a year since I’ve started this thing, and I must say…it’s been a blessing. I know that term gets thrown around a lot, but I really mean it when I say it. It’s been a crazy year (both in and out of this blog), and I’ve learned so much about myself and about others along the way.

IMG_0991

In the past year, I’ve baked through over 60 recipes, made three birthday cakes, baked for a bridal shower, engagement party, and wedding, was featured on Welcome Home and on Rachael Ray magazine’s “#RRWhatchaCookin Featured Cook of the Week,” and made it to foodgawker (after 27 declines!). I’ve received so much support and encouragement from my family and friends, and I am thankful. But…

Soli Deo Gloria.

IMG_0886

Soli Deo Gloria means “glory to God alone.” I’ve been reading, researching, and racking my brain the past few days to find a concise way to explain this…but I can’t. It’s too difficult to define. The way I see it is this (with the help of John Piper and Mark Driscoll): the glory of God is the infinite beauty and worth of God publicly displayed. It is the “radiance of his holiness, the radiance of his manifold, infinitely worthy and valuable perfections (Piper).” It is His beauty and greatness, His infinite worth radiated for us to see. “God’s glory is the outward radiance of the intrinsic beauty and greatness of His manifold perfections (Piper).”

IMG_0987

You see, God deserves eternal praise. He should be our greatest joy and desire, and we should find hope and happiness in that fact that we have a God who loves us, knows us, and has sent His son Jesus to die on the cross for our sins. We should delight in our salvation in Christ and in the fact that we get to live for His glory. HIS glory, not ours, and not that we have to, but because we get to. “We get to finally do the singular cause for which we were made: to glorify God (Driscoll).” God created us for His glory; therefore, as His children, we should live for the glory of God.

IMG_1035

If you’ve noticed, I always end my posts with Soli Deo Gloria. I do that for two reasons: 1) As a reminder to myself that all glory be to God; 2) because all glory really does belong to God. And this is true because we are called to glorify God in all that we do, as it is commanded in 1 Corinthians 10:31: “So, whether you eat or drink, or whatever you do, do all to the glory of God” (ESV). I know that was an abnormally long introduction, but a) it’s my birthday (kindasortanotreally) and b) this is important to me, and I pray and hope that this may be an encouragement to you as it is to me. You can read more here, here, here, and here.

IMG_1005

I’m celebrating gracefulleats’s first birthday with my favorite chocolate cake and vanilla buttercream. I first made this for a birthday cake I had to do back in September, and it was the best chocolate cake I’d ever made–I haven’t gone to a different chocolate cake recipe yet! The cake has a strong chocolate flavor, is moist, and isn’t too sweet. It pairs perfectly with the vanilla buttercream which is sweet, fluffy, and creamy. It doesn’t have that greasy taste that a lot of other buttercreams have. The recipe below makes a two-layer 6-inch cake (I cut my two layers in half so I had four) and enough buttercream to frost and fill the cake generously.

IMG_1001

IMG_1004

Chocolate Cake
Makes two 6-inch layers
From Whisk Kid

Ingredients:

1 1/3 cups all-purpose flour
3/8 cup unsweetened cocoa powder
1 1/2 teaspoons baking soda
1/4 teaspoon salt
1/2 cup (1 stick) butter, room temperature
1 1/2 cups brown sugar, lightly packed
2 eggs, room temperature
1 teaspoon vanilla
2/3 cup sour cream, room temperature
2/3 cup hot coffee

1. Preheat oven to 350 degrees F. Grease and line with parchment paper two 6-inch pans. Set aside.

2. In a medium bowl, sift together the flour, cocoa, baking soda and salt, and set aside.

3. In a large bowl, cream together the butter and sugar, until very light and fluffy, about 5 minutes. Add the eggs, one at a time, and beat well after each addition. Add the vanilla.Pour in a third of the dry ingredients, mix until just combined, then add half of the sour cream and mix until just combined. Repeat–add the rest of the dry ingredients, mix, then add the rest of the sour cream; mix until just combined. Gently stir in the hot coffee, and pour the batter into the prepared pans.

4. Bake the cakes for 35 to 40 minutes, until a toothpick inserted in the center of the cake comes out clean. Cool the cakes in their pans on a cooling rack for 10 minutes, then remove the cakes from the pans and let them cool completely before frosting.

IMG_0883

Vanilla Buttercream
Makes enough to frost and fill a 6-inch layer cake

Ingredients:

1 1/2 cups (3 sticks) unsalted butter, softened
5 cups powdered sugar
1 tablespoon vanilla extract
3-5 tablespoons heavy cream

1. In a large bowl, cream together the butter and the sugar. Stir in the vanilla. Add the heavy cream, and beat until fluffy. You can add more or less heavy cream depending on how thick you like your frosting.

For Assembly: The Whisk Kid has a really good tutorial on assembling a layer cake. You can find it here! I promise it’s super useful! I really enjoyed it, and it was helpful for me too.

Enjoy!

IMG_0998

With all that said and done…here’s to another year. Whatever comes my way, I’m ready! I’m ready for the opportunities, the learning experiences, and the baking adventures. Thank you all again for your support! And as always…

IMG_1018

Until next time,

SOLI. DEO. GLORIA. (and happy reading, eating, and baking!)

Baking Through the Alphabet: C is for Crème Brûlée Cheesecake Bars

IMG_5896

First things first, SWITCHFOOT.

For those of you who know me, Switchfoot is my favorite band. They’re an alternative rock band from San Diego, and they play good music with good lyrics.

Processed with VSCOcam

A few weeks ago, my friends and I drove up to Santa Barbara for their Fading West tour. We met up with another friend there, and the four of us went to the concert together. It’s my third time seeing them (I saw them this past June at the San Diego Fair and last fall in Anaheim), but it was different because the first half was the premiere of the surfing documentary they just finished. Who knew a surfing documentary would be that exciting, huh? They had a short set after the movie. After the concert, we decided to flock down their tour bus in  hopes of seeing them before they left. We caught Jerome Fontamillas, who’s the instrumental genius and plays (I swear) everything. We got his autograph and a picture with him!

IMG_6556

We were able to catch Jon Foreman, the lead singer, and he was kind enough to give whoever was there an after show at the back of the venue. I’ll embed the video I got at the end of the post. But seriously, these guys just seem so genuine! I mean, I haven’t met them before, but the way they write and make and talk about music is so pure and amazing. VIP next round, maybe! Good music, good weather, good company. ‘Twas a good weekend indeed.

IMG_0287

BUT ENOUGH ABOUT SWITCHFOOT.

IMG_5892

Crème. Brûlée. Cheesecake. Bars.

IMG_5886

Creamy cheesecake topped with a beautiful brûlée.

Cheesecake meets crème brûlée.

Deliciousness meets even more deliciousness.

IMG_5867     IMG_5880

It’s as good as it sounds and looks. There’s just something satisfying about tapping a brûlée-d top and watching it crack. And it’s even more satisfying when you know you’re digging into rich, creamy cheesecake (also satisfying when you’re eating actual crème brûlée too…but you get the picture. right?). It’s definitely simple; no custards/egg yolks, no having to heat up cream or anything, no water baths. The crust is thick, the filling is luscious and creamy, and the the tangy-ness of the cream cheese is paired perfectly with the sweetness of the sugar in the cheesecake and from the crème brûlée topping. The cheesecake bars aren’t too sweet at all, and they’re super quick and easy to make. It just requires the extra step of torching the tops, but hey, it’s always fun to play with a torch, right? =) (definitely be safe, people!!)

IMG_5900

Crème Brûlée Cheesecake Bars
Makes one 8×8 square pan
From Handle the Heat

Ingredients:

For the Crust:
9 whole graham crackers
1/4 cup (1/2 stick) unsalted butter, melted

For the Cheesecake:
2 (8 oz) packages cream cheese, at room temperature
1 cup granulated sugar
2 large eggs
1 large egg yolk
1 vanilla bean, split and scraped (I used 2 teaspoons vanilla extract)
1/2 teaspoon salt

For the Brûlée Topping:
1/4 cup granulated sugar

1. For the Crust: Preheat the oven to 350°F. Line an 8-inch square baking dish with foil, and leave an overhang for easy removal later.

2. In a food processor, pulse the graham crackers until finely ground. Add the melted butter and pulse until moistened. Press the graham cracker mixture into the bottom of the prepared pan. Bake for 8-10 minutes, or until lightly browned and set. Let the crust cool and reduce the oven temperature to 300°F.

3. For the cheesecake: Beat the cream cheese until smooth (you can use either an electric mixture or a food processor). Add the sugar, eggs, egg yolk, vanilla bean/extract, and salt, and beat until smooth and well combined.

4. Pour the mixture into the pan, and bake for about 45 minutes, until the cheesecake is set and still slightly jiggly in the center (don’t worry, it’ll set as it cools). Be careful to not overbake. Let the cheesecake cool completely in the pan, then cover and chill until firm.

5. When the cheesecake is firm, cut into squares. I cut off the edges of my cheesecake so I could have a smooth top to form the brûlée.

6. On a heat-safe work surface, sprinkle the tops of each square with sugar, and being careful, torch the tops with a kitchen torch until it turns a deep amber color. If you want a thicker brûlée top, sprinkle more sugar on top. You can refrigerate the cheesecakes, but the brûlée will start to soften as it sits in the fridge. Enjoy!

IMG_5884
IMG_5903
Until next time,
Soli Deo Gloria, and Happy reading, eating, and baking!
P.S. =)